Ole Mole

Monday, January 25, 2010

It is once again my honor to present a post from colder climates, not from Mexico as this post might have one believe. And yes, my bike does have a name. Without further ado, here is Meg!

When trying to come up with a name for Graham's bike, his all-important transportation compatriot, we tended towards Mexican foods. Southern California and our affinity for good Mexican were probably the inspiration, but for some reason "taco" and "nacho" were stricken from the list, perhaps because the nacho fetish is more mine than Graham's. Alas, "mole" was the obvious choice, the beautiful brown sauce that came into our lives senior year of college.

I spent a good part of my winter break senior year in the Huatusco region of Mexico trying to understand the impact of Fair Trade certification on coffee farmers. It was not the party-filled adventure that most Americans associate with the coast of Mexico, however I did need a souvenir and was rightfully instructed that mole was the proper choice. The wonderful coffee farmer who hosted me drove down a windy road to a little, mostly dilapidated, house. Together, we walked up to the front door and knocked, and a plastic bag of brown goo was presented to me. I must admit that my initial thoughts were mostly negative: "you want me to go through US customs, admit to hanging out on Mexican farms with all sorts of livestock, and carry this bag of unidentifiable mass?" But, I did make it back to Boston with mole in hand, enjoying it's complex tastes shortly after taking a much needed shower.

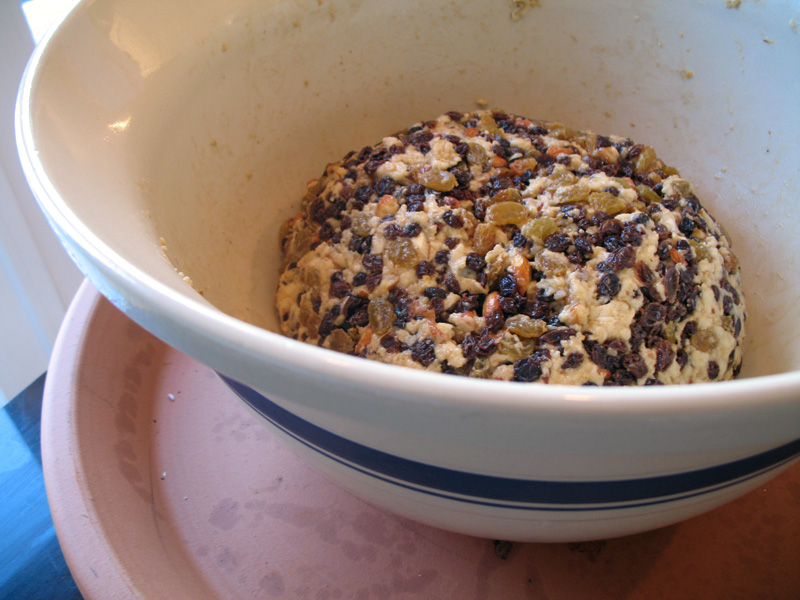
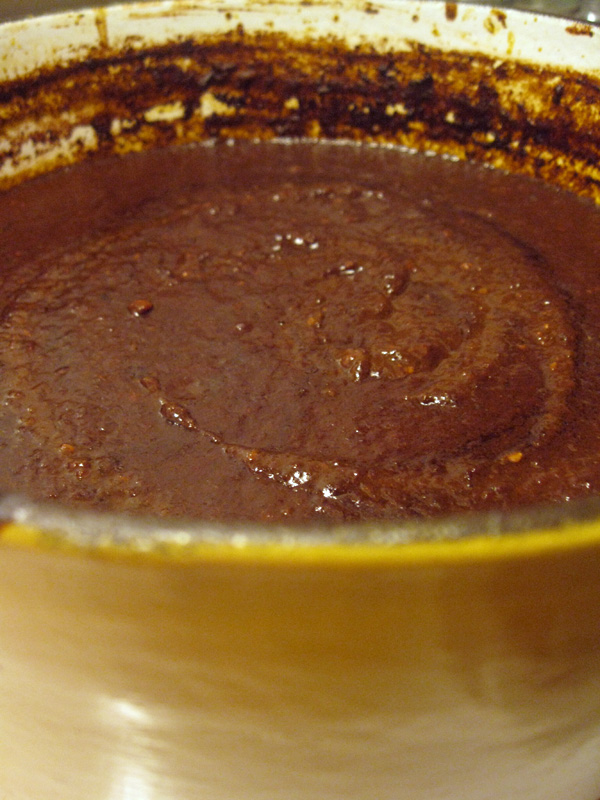
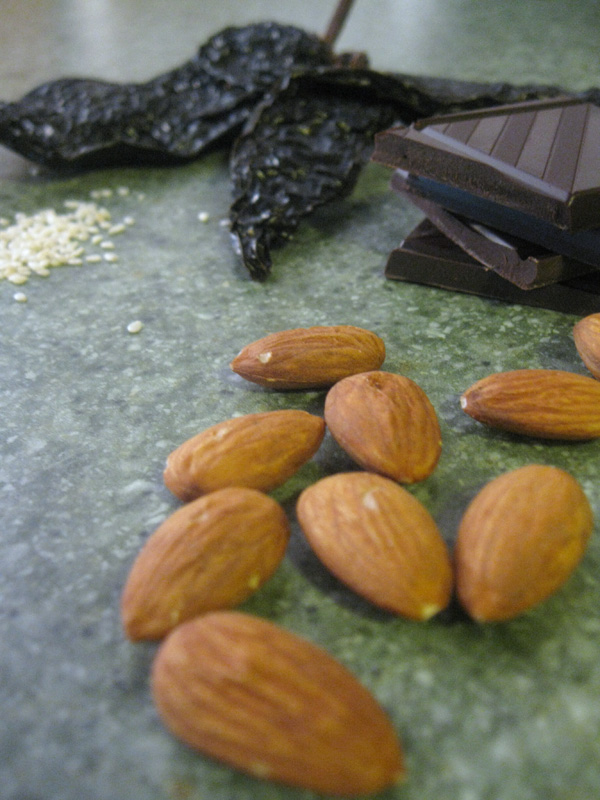
Imagine. A sauce of chocolate, chilies, almonds, cinnamon, tomatoes, onion, sesame seeds... the list goes on. This is mole poblano, one from a long line of moles native to Mexico. It can be served over any meat (this particular recipe calls for an entire turkey) or with tamales or enchiladas. I should make it clear upfront, though, that this is not a quick meal. Most Mexicans only prepare mole on special occasion given the length of time required. The recipe I am about to present actually recommends spreading the tasks over four days, although I think an entire day spent at home (with ingredients already procured) is sufficient. On our first attempt, we spent about three hours, but most seem to agree that more time means more amazing mole. The aromas aren't so bad either.

This recipe makes about 3 quarts (apparently enough to feed a dozen hungry graduate students with leftovers.)

Mole Poblano
Adapted From Rick Bayless'
Authentic Mexican

Everything and Then Some
  • 16 medium dried mulato chiles
  • 5 medium dried ancho chiles
  • 6 dried pasilla chiles
  • 1 dried chipotle chile
  • 1/4 cup sesame seeds
  • 1/2 teaspoon coriander seeds
  • 1/2 cup plus 2 tablespoons vegetable oil (or lard)
  • 1/3 cup unskinned almonds
  • 1/3 cup raisins
  • 1/2 medium onion, sliced
  • 2 cloves garlic
  • 2 slices bread (stale preferred but toasted works)
  • 15 oz. can of diced or crushed tomatoes, drained
  •  3 oz. Mexican chocolate, roughly chopped (or 3 tablespoons unsweetened cocoa)
  • 4 cloves (or 1/8 teaspoon ground)
  • 10 black peppercorns ( or 1/4 teaspoon ground)
  • 1 inch cinnamon stick (or 1 teaspoon ground)
  • 8 cups broth (I used chicken)
  • salt (to taste)
  • 1/4 cup sugar (or to taste)

The General Ordeal
  1. Prepare. Seriously. With this many ingredients, you need to accumulate, chop, and measure everything before turning on the stove. I like to put my ingredients in lots of little bowls so they are on hand and ready to be added to the pot. In separate bowls, measure out the almonds, chocolate, sesame seeds, raisins, coriander. If using whole peppercorns, cinnamon, and cloves, pulverize those together (either with a mortar and pestle or a spice grinder) and dump those into their own bowl. Slice half an onion and add to its own bowl. Get out your two slices of bread and peel two cloves or garlic. Have your broth and oil (or lard) on hand. Drain the can of tomatoes and dump into a large bowl (other things will be added). I will call this the "tomato bowl."
  2. Now the chiles. Carefully devein and remove seeds (keep 2 teaspoons of the seeds and add to another bowl), ripping into flat pieces. Just pile them all together somewhere in your cooking area.
  3. Time to turn on the stove. I use a dutch oven for the process, but a large pot will work too. Turn the stove on to medium heat. First we will toast the seeds: sesame, coriander, and chili (not the chiles themselves, just the reserved seeds). Dry toast (no oil) until they are slightly browned. I chose to do them separately just to be sure not to burn. Add the toasted seeds into the tomato bowl. Add 1/4 cup oil to the dutch oven. Once hot, add the almonds and toast for about 4 minutes Remove from pot and add to the tomato bowl. Add the raisins and cook until they start to puff up. Remove and add to the tomato bowl. Then add the onions and garlic and let cook down for about 8-9 minutes, until soft but not brown. Add to the tomato bowl. Add the two pieces of bread, just a few seconds on each side, then remove, tear into small pieces and add to the bowl. Add the chocolate, ground peppercorns, cinnamon, and cloves into tomato bowl too. Set this bowl aside for now.
  4. Now onto roasting the chiles. Chile fumes can get intense, so you might want to warn your housemates and also turn on the exhaust fan above your stove. In the same dutch oven still on medium heat, rid of the old oil and add another 1/4 cup vegetable oil (or lard). Once hot, dump in a handful of chiles. You want to brown them a bit on each side, just a few seconds each. Once they seem a bit soft, take them out of the pot and dump into a large bowl (a new bowl, not the tomato bowl). Repeat with all of the chiles. Bring some water to a boil and dump over the bowl of toasted chiles. You want to submerge them all, so I put a plate on top to make sure they all remain under water. Let sit for at least one hour (I opted for 1.5 hours).
  5. Time to puree. The contents of each of our two bowls will be pureed separately. Add 1/4 of the mixture from the tomato bowl into the bowl of a food processor along with 1/2 cup of broth. Puree until smooth. Repeat with each portion of the tomato mixture (use 2 cups broth total for all of the tomato mixture). Dump back into a clean bowl. Now we will do the same thing with the chiles. First, drain the chiles in a colander to remove steeping water. I took 1/3 of the chiles at a time into the food processor along with 1/2 cup broth. Repeat with all portions of chiles (use 1.5 cups broth total for all of the chile mixture). Return to a separate clean bowl.
  6. Now we can combine. Reheat your dutch oven or pot and add 2 tablespoons oil. Once warm, add the chili puree mixture through a metal strainer, trying to rid of larger chunks. I started to do this, then decided I wanted those chunks of chili and just dumped it all in. Completely up to you. Then stir constantly for about 5 minutes or until the mixture appears to thicken. Do the same thing with the other mixture, adding to the chile mixture, straining of you desire. Stir again and let cook together for about 5 minutes. Add another 4 cups of broth or so (the consistency should resemble thick cream) and let simmer on low heat for at least 45 minutes (I went for about 2 hours). You probably want to cover, at least partially, to prevent a large amount of mole from splashing onto your stove top. Here, add a pinch of salt and the sugar. Stir and taste. Feel free to add whatever other spices seem necessary and serve with your chosen accompaniment.

NB: I served this over chicken, but I am sure you can be more creative. The sauce could easily be made vegetarian by using vegetable broth and serving with a variety of squash or pumpkin.

Almost Healthy Dessert

Wednesday, January 20, 2010

It contains an entire carrot and an entire potato, though any potential health benefits are surely staved off by the half pound of butter. This falls in line with the black bun with its recent return to the Rowlands family holiday baking exploits.

I'll make this a quick one — since the recipe really doesn't require much in the way of preparation. The cooking time, however, is a bit of a stretch coming in at three hours. I'm to believe that a pudding mold is a reasonably essential tool in this endeavor, though I imagine some ingenuity with a bundt pan and aluminum foil might be sufficient. I don't own one of these things, even with my relatively high tolerance for obscure culinary paraphernalia. I'll spend the rest of the post assuming you've worked something out.

To completely ruin any illusions of healthfulness, this pudding should be doused with hard sauce — which is literally a paste of flour and confectioners sugar, though rum can make an appearance as the least worrisome ingredient.

Carrot Pudding

The Pudding
  • 1 Cup Flour
  • 1 Cup Sugar
  • 1/2 Cup Butter
  • 1 Tsp. Baking Soda
  • 1 Cup Grated Raw Carrot (2 Medium)
  • 1 Cup Grated Raw Potato (2 Smallish)
  • 1/2 Cup Currants
  • 1/2 Cup Raisins
  • 1/2 Tsp each Nutmeg, Cinnamon, and Ground Cloves

The Sauce
  • 1/2 Cup Soft Butter
  • 1 1/2 Cup Sifted Confectioners Sugar
  • 2 Tbs. Rum or Brandy

Fabrication
  1. Sift the dry ingredients into a bowl, then stir in the fruit until covered.
  2. Add butter and raw vegetables, mixing until combined
  3. Turn into greased pudding mold and steam for 3 hours.
  4. Cream the butter and sugar together before incorporating the rum or brandy. The hard sauce must be stored in the fridge for it to reach its namesake consistency, though I suspect that the "hard" might refer to something else altogether.

NB: Best served warm. 1/2 Cup of nuts can be substituted for currants. Also allspice can be added, though it has been experimentally determined to add little additional flavor.

Don't Fear the Beer

Wednesday, January 6, 2010

I should probably wait until the thing is bottled, carbonated, and consumed — but really I just want to talk about the beer sooner rather than later. This is all-grain brewing attempt number two, following after the batch I lovingly refer to as "Fail Pale Ale." Probably I shouldn't be so hard on that one, especially since it was a somewhat awkward foray into brewing more advanced than Chris and I had attempted before. Partly this was because it was only our second batch, the first having come largely from a goop-filled bag that came with the fermenting buckets. The picture below is from the IPA, as one may have gathered I obviously need to work on my beer photography.

Let me first complain about apartment stoves in this here graduate housing. After visiting friends in NYC, they with their fancy-schmancy gas stoves, I returned here to look down upon some unbalanced and misshapen coils stuck in a bright white cooktop. It's well known white doesn't show stains. These stoves take, and I stress the magnitude of my frustration here, seemingly forever to heat up 6 gallons of water. The better part of an hour, seriously...

This turns brewing into an all-day event, which wouldn't be so much of a problem if we didn't start the process in the afternoon sometime. This can be chalked up to poor planning, though I would like to blame it on the stove nonetheless.

Well anyway — Chris dug up this recipe somewhere that we can't locate anymore. Originally it was supposed to be a coffee porter, though we didn't have the beans on hand to facilitate such frills. The process on this one was pretty simple: a single temperature mash and two relatively small hop additions. We sprung for a secondary fermentation period since the IPA we tried was fairly cloudy.

This would be the second yeast-themed post I was talking about, though I can't really comment on the success one way or another. It's a pretty bare-bones porter, which probably makes sense given our inexperience. Surely we will have an update soon, inside of another three weeks.

Coffeeless Coffee Porter

The Whole Shebang
  • 10 Lbs. 2-Row US Pale Malt
  • 0.5 Lbs. Chocolate Malt
  • 0.5 Lbs. Crystal Malt (120)
  • 2 Oz. Golding Hops
  • White Labs English Ale Yeast
  • 3 Oz. Sugar For Bottling

Abbreviated Process
  1. Steep milled grains with around 3.5 Gallons water for 1 hour at 153F, maintaining temperature by reheating some drained-off mash liquid and adding back to the mash. Stir occasionally.
  2. After recirculating the first few cups of wort, drain off the mash into the boiling pot.
  3. Sparge with another 4.5-5 gallons of 180F water, letting the mash rest for a few minutes before repeating the same draining procedure. Total volume of wort should be 5.5 gallons or so.
  4. Boil 60 minutes, adding 1 Oz. Golding hops at the start and 30 minutes in.
  5. At 30 minutes pitch yeast into a cup of cooled boiled water with 1 tsp. sugar
  6. Cool wort and aerate heavily into primary fermentor, pitching yeast upon completion.
  7. Ferment a scant two weeks before racking into secondary fermentor for another 2 weeks (or your equivalent winter break.)
  8. Mix in boiled sugar with wort in bottling bucket, and rack into sterilized bottles.
  9. Wait another 2-3 weeks for (potential) goodness.

NB: Fingers are crossed...

Brick or Bread?

Sunday, January 3, 2010

Along with a barbecued turkey, this fruit-stuffed rock has fast become a wintertime culinary tradition at my parents' abode. A stunning 10 cups of fruit are packed into 6 cups of flour, resulting in something akin to a gigantic scone. Systematic attempts to incorporate all of the fruit into the dough are seemingly futile — the only successful method has been repeatedly squeezing the dough between one's fingers. The loaf is a traditional Scottish gift presented on New Year's Day (Hogmanay) — presumably as a hangover cure or some such thing. An added benefit of the loaf's density is that is stores for at least as long as it takes to nibble the thing down to nothing.

Cooking can be done either on a baking sheet or a stone — the back of a ceramic flower-pot drip-tray makes a pretty wonderful alternative to more expensive options.

This isn't the second yeast-themed post I mentioned before, though that should be coming soon. This month will probably be spent catching up with all of the posts that I wanted to do last month had I not been focussed on other matters. Bread will probably become a more frequented topic around here, especially since I recently received some bannetons as a gift. Testing one out with a batch of ciabatta dough led to a stunningly "artisinal" loaf, at least by visual standards. Maybe I can start selling the things for $8, which wouldn't be a bad profit margin given that the recipe is of the no-knead variety. If a physics degree doesn't prove fruitful I can always fall back on this.

Without further delay, we have a the doorstop itself. The recipe is through my dad, but originally from the Book of Bread.

Scotland's Black Bun

The Filling
  • 1 Cup Chopped Orange Peel (or 1/2 Cup Dried)
  • 3/4 Cup Chopped Whole Almonds
  • 4 Cups Currants
  • 1 Cup Black Raisins
  • 3 Cups Yellow Raisins
  • 1/4 Cup Brandy
  • 2 Eggs

The Dough
  • 6-7 Cups Flour
  • 1.5 Sticks Butter
  • 2 Tbs. Sugar
  • 1.5 Tsp. Yeast
  • 2 Cups Warm Water
  • 2 Tbsp. Salt

Getting the Dough Started
  1. Let yeast dissolve in the warm water for a few minutes
  2. Stir in sugar, 1 cup flour, and salt until combined. Next alternate adding 2 tbsp. butter and 1 cup flour until you have around 6 cups of flour and the dough isn't overly sticky. Let rest while cleaning and buttering the bowl, then knead for 8-10 minutes until it is smooth and pliable. Return to bowl and cover with plastic wrap.
  3. Let rise somewhere warm until doubled, around two hours.

The Filling
  1. Combine all filling components less the eggs. If using dried orange peel, reconstitute in water before adding.
  2. When the dough has finished rising add the eggs.

Dough: Next Steps
  1. Preheat oven to 350F.
  2. Separate and cover 1/3 of the dough for making the "jacket."
  3. By whatever means necessary, incorporate the filling into the dough.
  4. Roll the reserved piece of dough out into a circle large enough to wrap around the combined dough and filling. Wrap up and use some of the excess material at the top to patch any holes that may have developed. Invert the loaf onto a parchment-lined sheet-pan (the seam you've just formed is on the bottom of the final loaf.)
  5. Using a chopstick, poke a number of steam-holes all the way through the loaf.
  6. Either slide onto stone or bake on sheet-pan for 1.75 hours.
  7. Let cool on rack.


NB: Molasses can be added to achieve the namesake appearance of the bun, though the flavor is quite nice without.